

I’m chugging along with the flip house room reveals like a crazy lady. Or maybe just like a proper blogger? Either way I hope you haven’t been too alarmed by my level of efficiency – LOL!
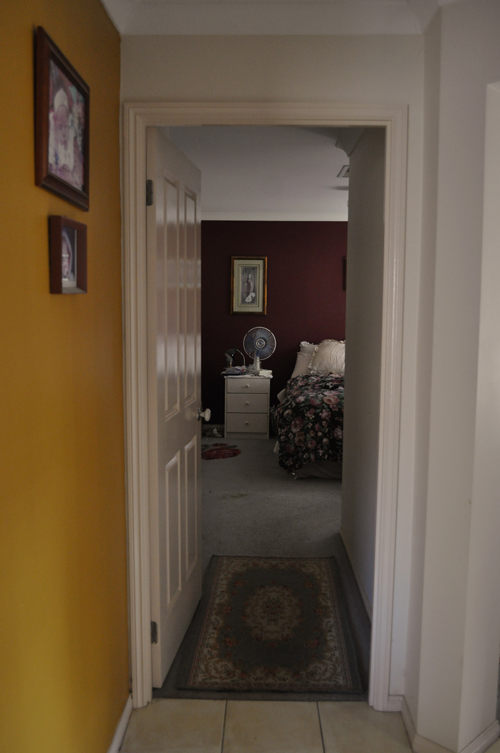
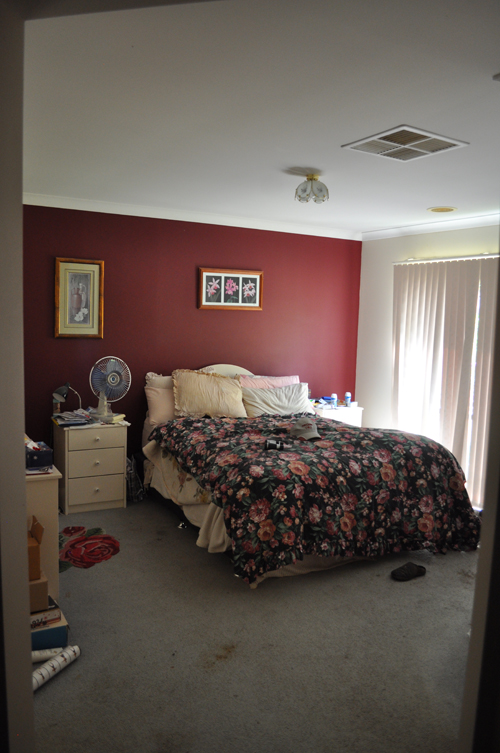
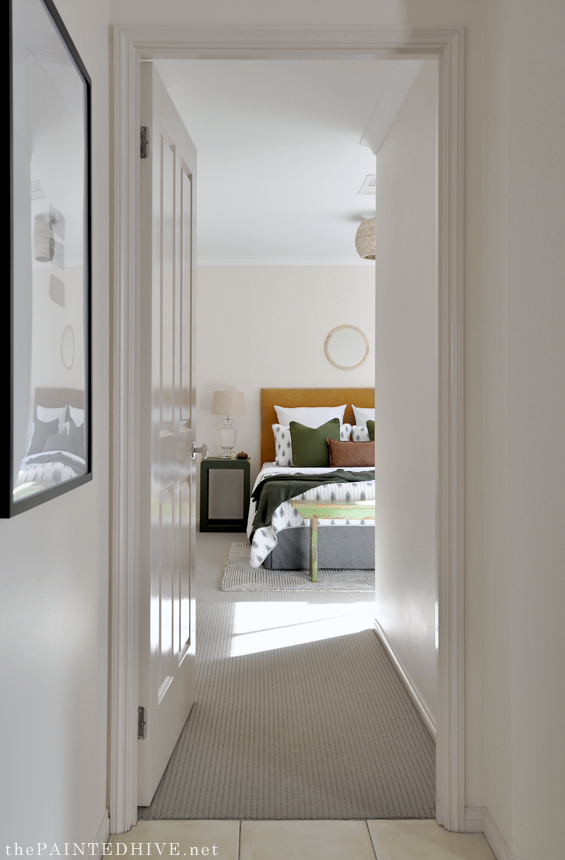
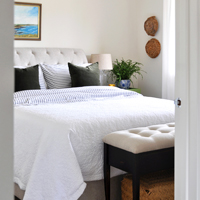
This is the master suite which features a bedroom, ensuite and walk-in-wardrobe. Here’s how it looked a few months back…

And here it is now…
You can find side-by-side before and after images toward the end of the post.
Sorry, I didn’t take an after of the wardrobe because all we did was clean it out.
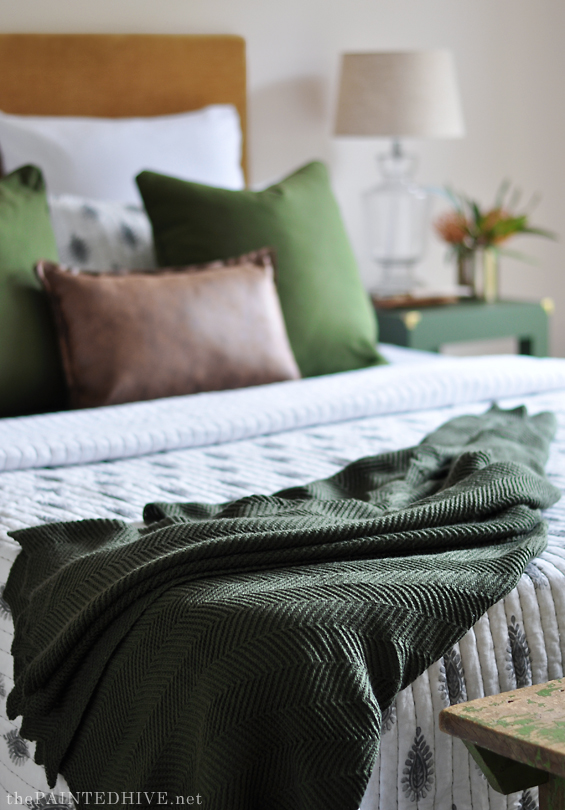
The master bedroom is one of the first rooms you glimpse as you walk in the front door. Given it has its own little entry hall I really wanted to draw people in and set the overall tone for the house with a slightly sophisticated mood.
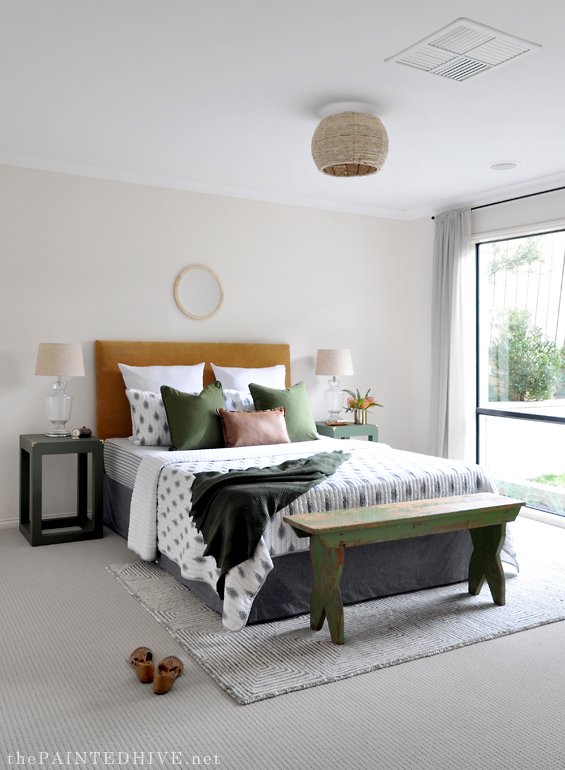
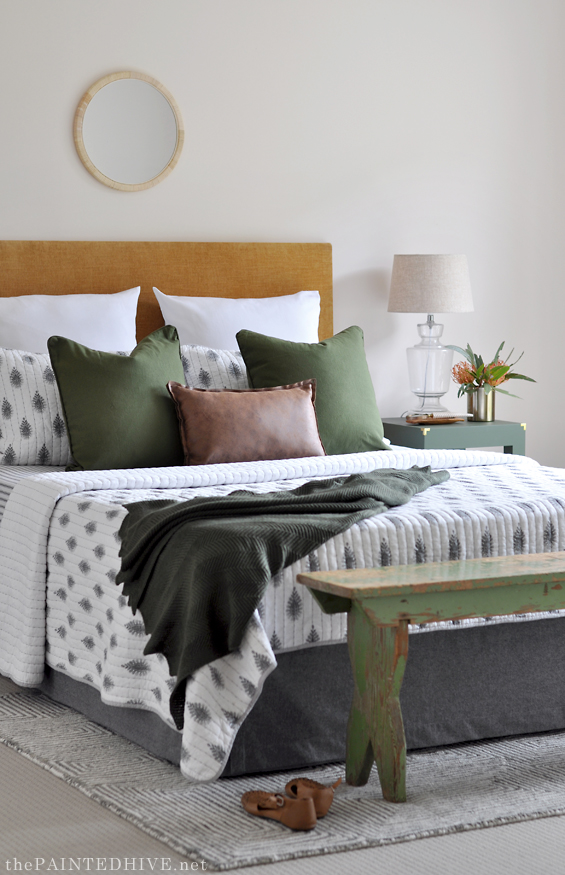
The jumping off point was the mustard headboard which was an easy and affordable DIY (I’ll share a tutorial in the coming weeks).
We were lucky to already have the basic bed ensemble (as per the before pic) though the original Queen Anne style headboard just wasn’t working with the scale of the room. To give the bed some presence and added oomph something more significant was needed.
Initially I was going to go with a bold and contemporary pattern for the headboard, though I couldn’t find quite what I wanted, and then I stumbled across this plush mustard fabric.
I was smitten, and immediately pictured it with deep green, aged leather and shiny brass. It’s a slightly unusual colour scheme though I love that it’s different.
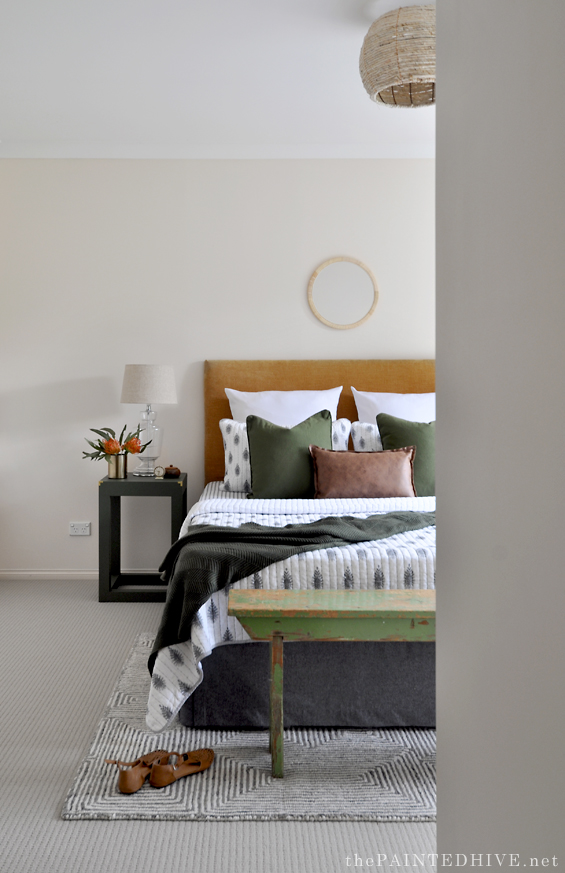
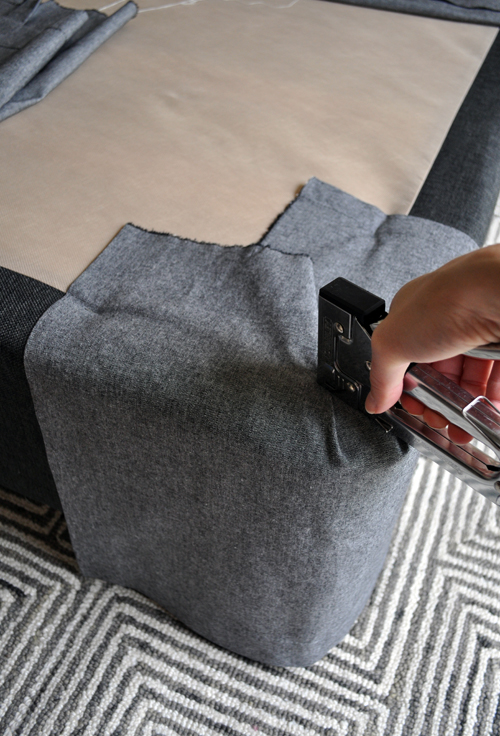
To compliment it I upholstered the bed base in a linen-look charcoal, which is actually a curtain panel!
Bed skirts, or valances, can be expensive, plus they don’t tend to come in a great range of styles and fabrics (and often they don’t fit well). By making your own you can tailor it perfectly and choose from a wide range of fabrics. I went with a curtain panel because the fact it’s already hemmed means there’s no sewing required! And often they are cheaper than buying the same amount of fabric off the bolt.
This curtain panel came in a set of two for $21 (on sale) and I used one whole panel plus a small strip of the second panel (I probably could have gotten away with using just one if I’d been more careful with my measuring). I’ll share a full tutorial in a future post though I essentially trimmed lengths to size then stapled them directly to the bed base until it was all covered.
The bedding is a mix of new and old.
The ticking sheet, block-printed coverlet set, faux leather lumbar cushion and green throw are things we already owned.
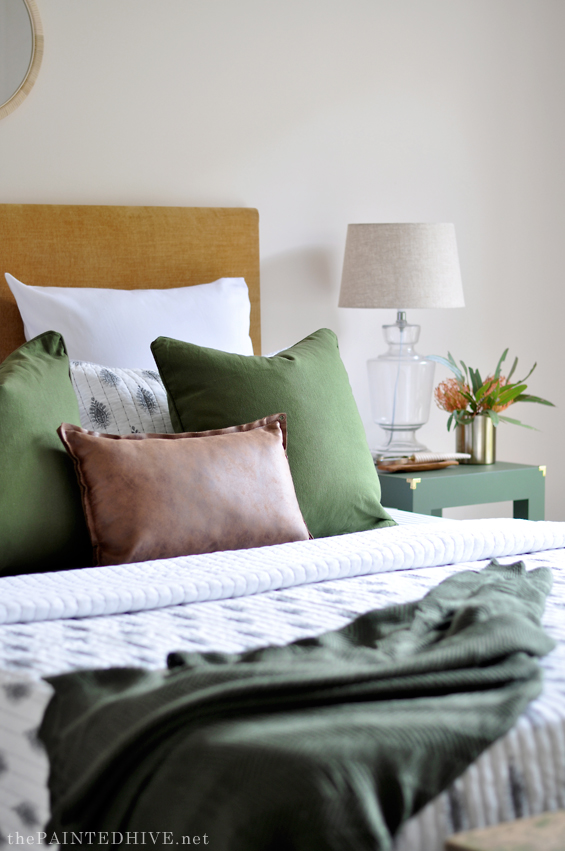
The green accent cushions and white euro pillows are from Spotlight.
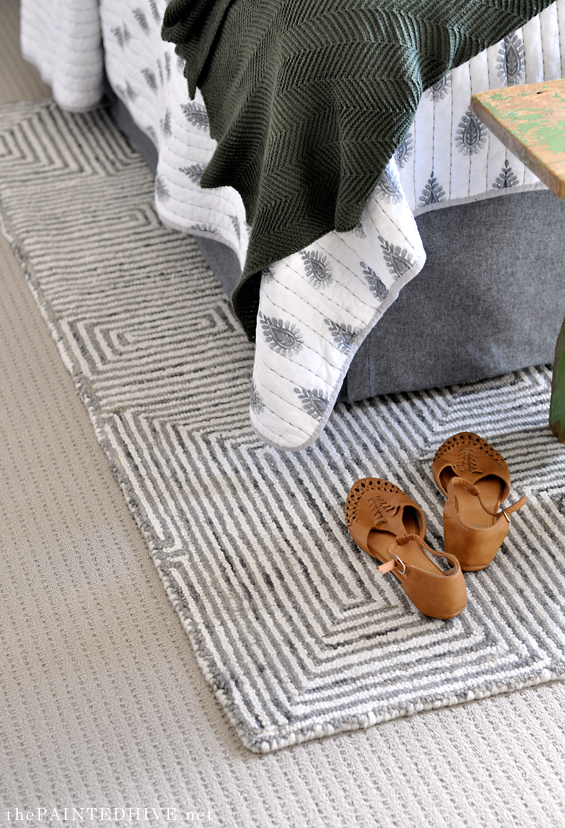
The rug was a bit of a happy accident. I picked this one up on sale, not quite knowing where I was going to use it, and it works perfectly in here. The grey has a gentle green undertone which references all the other green without being too much, and the geometric pattern adds a slightly modern touch.
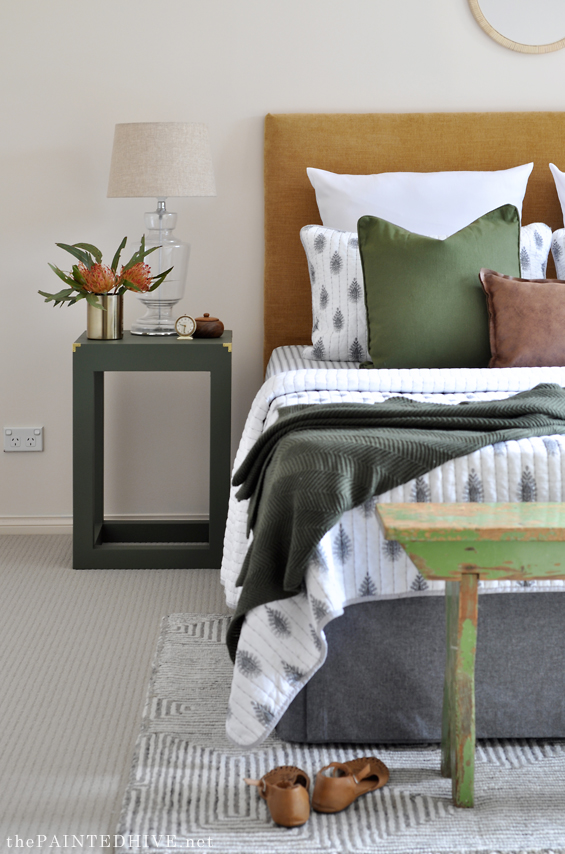
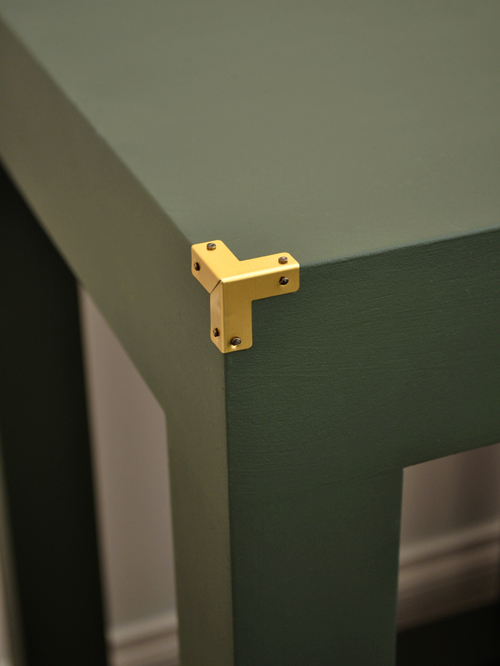
I would have loved some natural timber in here however no-one, myself included, was willing to sand the cube tables I found on eBay back to raw. It wouldn’t have been a super difficult job, though it’s not the funnest things to do in the world, especially when you already have a million projects on the go.
The original wenge finish was a little too dark, and damaged, so I decided to simply paint them using some left-over green sample pot paint.
I then added these cute brass corners from D Lawless Hardware for a touch of interest. It’s all in the details.
Atop the side tables sit glass lamps which I stole from my parent’s beach house (you may recognise them from this old makeover) and a variety of simple decor we already owned.
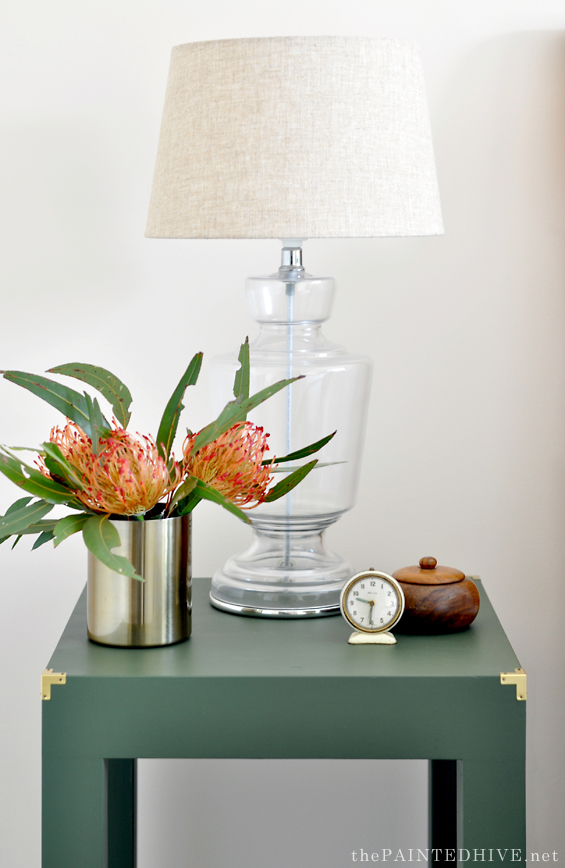
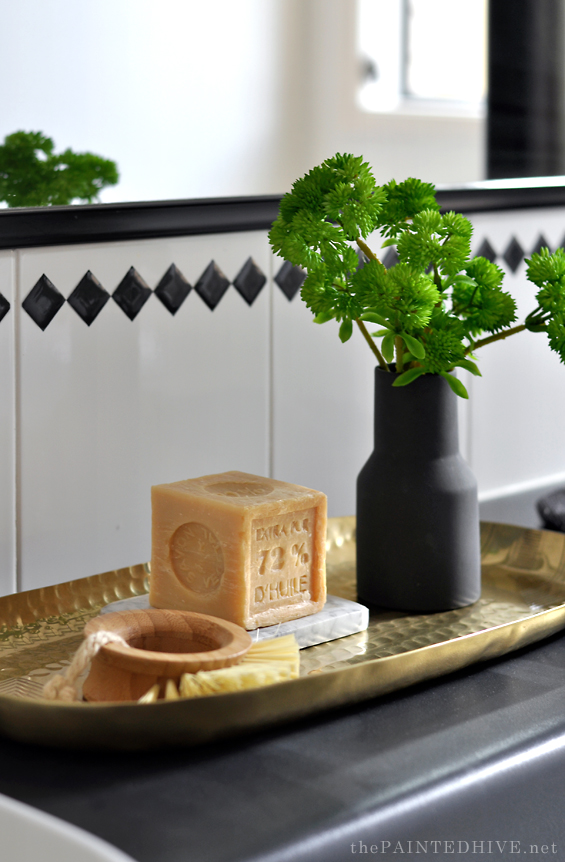
The brass planter holds faux Pincushion blooms (could you tell?) which I’ve supplemented with real gum leaves. Adding real foliage to artificial flowers is a no fail way of making them appear more authentic (although these ones do look pretty amazing as is). I adore live flowers though when you’re staging a property for sale it can get pricey replacing them every other week. This is a great cheat.

Another DIY from this space is the basket ceiling light.
I found this basket at Spotlight and immediately knew it was meant to be a light fixture! As with the headboard and bed skirt, I’ll share a full tutorial in the coming weeks though I essentially just re-purposed a lamp frame so I could attach it to the ceiling batten fitting like any regular light shade.

I was initially going to use it as a pendant though it felt a bit too imposing hanging low.
To give the natural seagrass a sense of belonging in the space, I added a simple cane mirror above the bed which speaks to it perfectly.
The curtains are the same sheers I used in the sitting room (Caprice Montego in ‘Linen’). I put them up in here first and decided I loved them so much I needed to use them again! They have a beautiful fall and each panel is nice and generous for a soft, full effect.
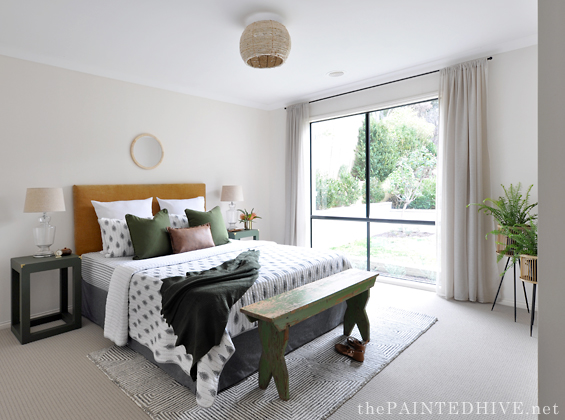
In my wide angle shot above I was able to capture the cute plant stands I have hiding around the corner.
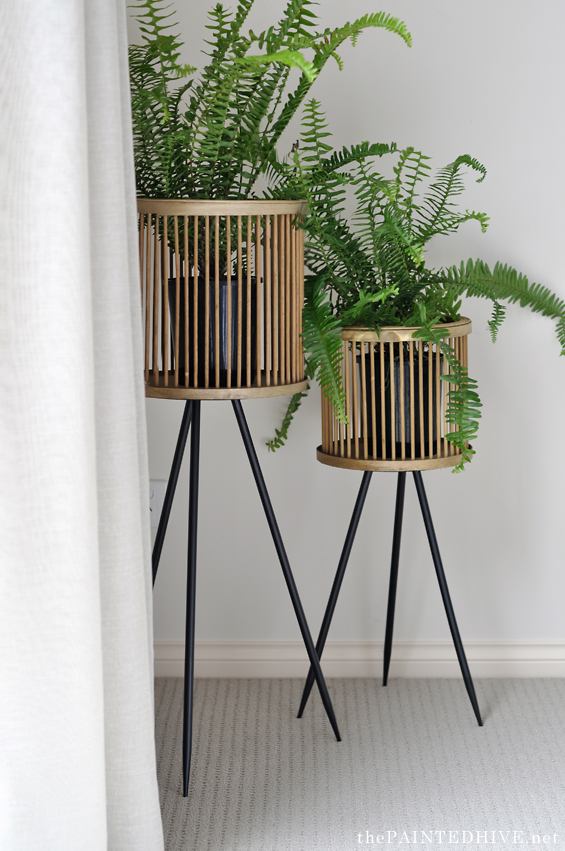
I’ve filled them with lovely lush ferns and they’re the perfect little accent to fill this bare corner and add a touch of life and freshness to the space.
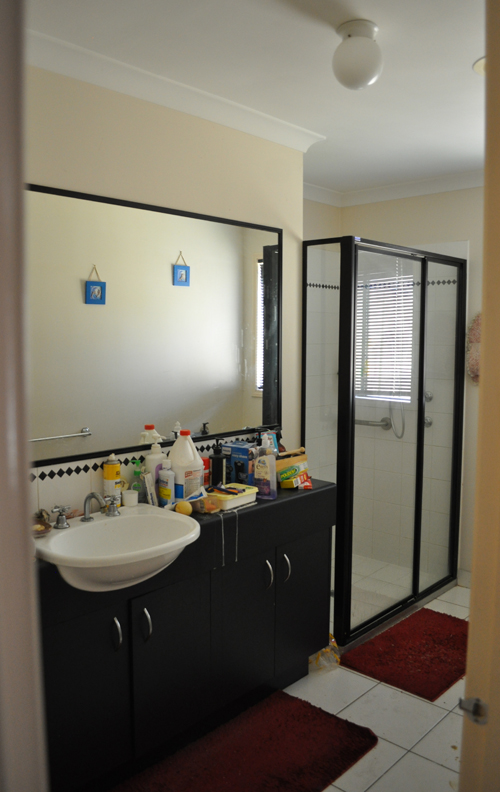
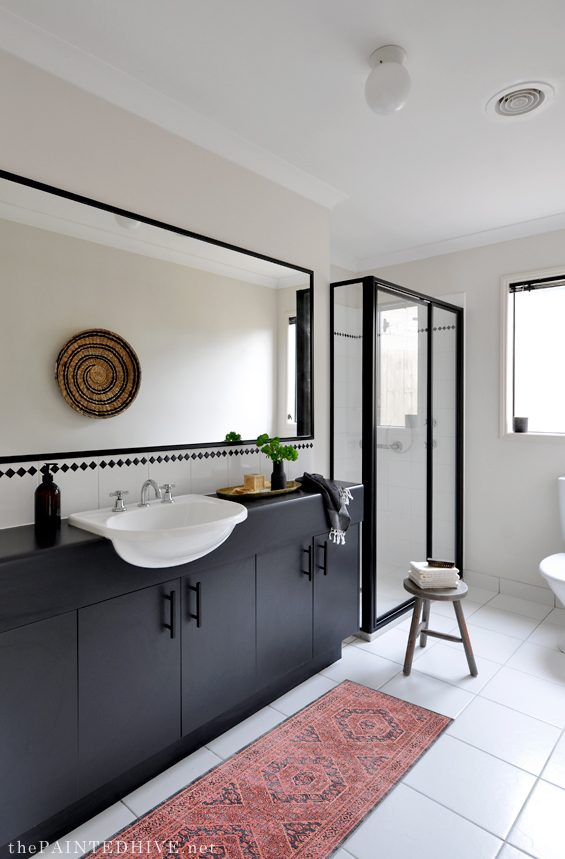
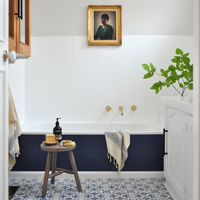
Although the transformation in the ensuite looks pretty extreme, we actually haven’t done much.
The toilet was a bit run down so we switched-out the seat and cistern to give it a fresh, clean look without replacing the entire thing.
And I had some left-over handles from the kitchen so we changed the original chrome pulls on the vanity for these more on-trend black ones.
Aside from that, it’s really just cleaning and staging.
We were fortunate it was so neutral to begin with. If anyone is currently designing their home and wants something which will stand the test of time, you can not go past classic black and white!
Most of the decor are bits and pieces we already owned.
The rug is vintage (borrowed from my aunt), and you may recognise the little stool from this previous DIY.
The little black vessel is another of my spray painted Op Shop finds which I’ve filled with sweet artificial sedum sprays, and the wall basket you can see reflected in the mirror matches those I’ve hung beside the front entrance. It looks a little lost here on that big blank wall however it’s actually positioned directly over the towel rail.
![]()
PRICE & SOURCE LIST (MASTER BEDROOM)
Carpet | Beaulieu Daytona in ‘Green Beige’ | $600
Light Fitting | DIY (basket from Spotlight) | $22 on sale*
Curtains & Fittings | Caprice Montego Sheers in ‘Linen’ (plus all hardware) from Spotlight | $65 on sale*
Floor Rug | Woolen Payton Maze Rug from Spotlight | $200 on sale*
Bed Ensemble | Already Owned | $0
Headboard | DIY (fabric from Spotlight) | $25
Side Tables | DIY (found on eBay) | $40
End of Bed Bench | Already Owned | $0
Round Mirror | Spotlight | $18*
Glass Lamps | Already Owned | $0
Planter Stands | Spotlight | $46 for both*
Ticking Sheet, Block-Printed Coverlet, Faux Leather Cushion, Green Throw | Already Owned | $0
Green Cushion Covers | Spotlight | $15 each on sale*
White Euro Pillow Covers | Spotlight | $4 each on sale*
Bed Skirt | DIY (using a curtain panel from Spotlight) | $15*
Brass Planter & Artificial Flowers | Koch & Co. | $32*
Other Decor | Already Owned | $0
TOTAL $655
PRICE & SOURCE LIST (ENSUITE)
New Toilet Cistern & Seat | Installed by Plumber | $160
Floor Rug | Already Owned | $0
Stool | Already Owned | $0
Wall Basket | Early Settler | $35*
Cabinet Pulls | eBay | $3 each
Artificial Sedum Sprays | Koch & Co. | $9*
Other Decor | Already Owned | $0
TOTAL $175
*We were super lucky to be gifted some items from Spotlight, Koch & Co and Early Settler.
I’ve provided their costs however they are excluded from the total.
![]()
Here are the side-by-side before and afters…
Hope you guys like it.
As mentioned, I’ll be back to share the DIY tutorials once the entire flip house has been revealed.
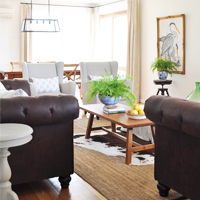
Next up I’ll be posting the open plan dining and living spaces (which just may be my favourite)!
![]()
Find all of the previous flip house posts HERE.


The post I’ve been drooling for! And it was certainly worth the wait, what a stylish, peaceful bedroom. Nailed it.
Ps u may have shared before but pls may I ask the sour cfe of the coverlet? Thanks x
Thank you :)
I got the coverlet from TK Maxx a few months back. It was the only one they had. I’m so sorry though I didn’t save the packaging so I’m not sure of the brand or product name.
Sorry I never responded.. thanks for the response. No worries!
Source of* sorry!
Wow! Looks amazing! The colours work beautifully together and the en-suite looks like a completely different space!
Thank you :)
OK, I’m packing up my stuff and coming to Australia, JUST to sleep in that bedroom. It’s stunning.
<3
Aw, too sweet. Thanks Pam :)
What an amazing transformation! It’s absolutely beautiful. I never would have thought to pick those colours – but they are SO beautiful together.
Love your transformations and the effort you take to be budget conscious. You’re really motivating me to think outside the box when wanting a change in my decor. So great to have a blogger who is in Australia so we can source some of the gorgeous things in your post. Great job Kristine!
Wow! That is a fantastic transformation, it’s really hard to believe they are the same rooms. You are one very talented person :-)
Love it! This is so refreshing. I’m so tired of home decorating bloggers who all seem to share the same color and style. The side tables caught my eye first, and gave me some ideas for my guest room. Love your designs!!
Thank you :)
Love the colors, use them in my own home! That bathroom is also amazing. Had to flash to before pics to believe you didn’t do much but clean it up!! Love it all!
Isn’t the bathroom super different? It’s amazing what was hiding under there!
I’ve probably said it before but you are a miracle worker. When I saw the before bathroom photo I wondered what you could do with all of that black and yet a scrub and style and it is a completely different space. Where do you buy those cute square soaps that you use to great effect? Even the shoes are gorgeous! You’re like Mary Poppins; practically perfect in every way. :)
LOL, practically imperfect perhaps? :)
They are my favourite staging soaps (no-one has ever actually used one – LOL). I bought mine from eBay though they are available in a few places. Search Google for “Savon de Marseille” :)
Gorgeous – wish I had your vision
Seriously, what an inspiration xx
Beautiful! Love all your ideas. I have to get working on my master bedroom. You have inspired me.
So lovely….what a wonderful job. I cannot believe the bathroom looks that good just by cleaning and changing the rugs out!!! Amazing. I love the addition of the corners on the table, as it adds so much to the look.
Stunning!! As usual :)
Can’t wait for all those tutorials! I really want to try the headboard and curtain panel bed base ones. That mustard color is my favorite.
Thanks :)
Beautiful. You’ve really got the knack.
You really ARE Pumping these posts out!! Another home run/slam dunk/ touchdown of a makeover!
Fabulous!
What a great job Kristine! You must be feeling so chuffed at how it’s looking. You have so many affordable ideas – many of which I’ve stolen for my daughters, who can’t afford full renos. Think I’ll be stealing a few of these ideas too ☺️
Thanks Cheryl :)
Can you talk a bit more about that lovely bench at the foot of the bed? Can you make a pattern if you did not build it yourself? It’s so perfect there!
Thanks, Marilyn
Thanks Marilyn. I was going to build one (even got started) though I ran out of time and oomph, so this is the bench which usually sits at the end of my bed. I bought it several years ago from an antique store. It’s not a difficult build at all. I’d like to make one in the future and if I do I’ll be sure to share the plans. If you have a Google around I bet you’ll be able to find something similar.
You can see the bench in my bedroom here:
https://thepaintedhive.net/2016/06/a-master-bedroom-mini-refresh/
What a huge difference changing the accent wall color from mustard and red to “white”. So soothing and calming. I questioned the mustard fabric for the headboard, but it works so well with the green, “leather and black, gray and white. Just subtlety stunning. Augh! I wish I could be there for the open house! Any chance you or the realtor will so a video walk through?
Thanks Pat. Yes, I’m thinking of doing a video walk-through for my Instagram stories. Not sure yet because I’m hopeless with videos though I guess I need to start somewhere!
Mood set! May the bidding begin:)
Nailed it! Looks so good superstar!
Aw, thank you :)
As usual with your makeovers, I go back and forth between the Before and After mumbling something about it couldn’t possibly be this same space. Amazing. I do think the green nightstand tables are my favorite. And the shoes casually placed at the end of the bed are brilliant. Great staging.
Thanks Brenda.
Yes, the ‘casually placed’ shoes which I relocated for different shots and moved half an inch this way or that until they were just right – LOL!
I did manage to get the throw right in one toss though – didn’t even need to tweak it. Winning!
Love what you have done! Can you incorporate or do a post that talks about realistic timelines with this type of makeover?
Thanks. Sure, do you mean on a room-by-room basis?
The curtain panel for bed skirt is brilliant. I love the whole thing. Amazing what just cleaning up the bathroom can do for it.
Every time a new post about the flip house, I just scroll down slowly so that it doesn’t end too quickly and I can savour every detail. Amazing change again! I love the bed head, the setting, the planters, the combination of colours…everything!
I know, there was actually a decent bathroom hiding under there!
Thanks so much :)
loving your flip transformation. was just wondering what colour paint you used on the walls. It definitely makes the house feel light and bright. look forward to your next post.
Thanks Bindi.
Most of the paint is original. Where we’ve painted over the feature walls I had the paint colour matched so it’s not an “actual” colour. It is similar to Dulux Hog Bristle Half though a tad less yellow and a bit more pink.
Every single square inch is just amazing. There aren’t enough positive adjectives in the world, sonill just stick with ‘amazing’. You’ve really wrought some major magic in this house!
Aw, too sweet.
I have the best readers :)
I find these before and after’s very meditative! How lucky that the shower frame was already black. Seriously lovely work I’ll need therapy when the daily updates are over!
LOL! Thanks Anna :)
Love it! Love it! Love it! Such a calming space. Amazing what a difference just raising the curtain rods make. Your ability to “see” a space continues to enthrall and delight! tfs xx
You really are a miracle worker. Great job. The colour scheme in the bedroom just looks amazing.
You should feel very proud of what you’ve achieved. Do you mind me asking what the wall colour is? Sorry if you’ve already stated that. Did you repaint the bathroom because that looks so much lighter but window treatments make such a difference to the lighting
Thanks Maree. Sorry, I don’t know the paint colour. It’s all original aside from the feature walls which we repainted to match using a custom colour-matched paint.
Giggling (and admiring) as I read this. “Vintage rug belongs to my aunt…lamps are from my parent’s beach house….”. I can hear your family and friends now: “Quick, hide the furniture! Kristine’s flipping another house!” 🙂 Really, really loved it. Looks so fresh and inviting!
LOL, too true!
Thank you for sharing this with us Kristine, you truly give us something to look forward to, what a treat we have to be able to read your blog so often. Remember the old days when there were no blogs and such enjoyment would only come out once a month with your favourite magazine? The colors in the master bedroom are soothing and delightful. So alive yet peaceful. The headboard is gorgeous, you are so clever to think to use such a great color fabric. I wouldn’t have thought to choose something like that and yet it warms the room and creates a focal point without stealing the show. Your idea to use curtain panels is so clever and I love how you share these tips with us. The green side tables are gorgeous with the little brass corners. Oh my word, the bathroom is gorgeous. What a transformation. You elevated it to sophisticated with the stunnning carpet. The small changes to the cabinet hardware made a big visual impact. So proud of you. Well done for such hard work and the thoughtfulness that went into this,
Thank you so much Sonja. What a lovely comment :)
Well once again you have left me…gob smacked!! This room is so serene and welcoming. Anxious to get info on the headboard. But from the green tables and gold hardware to the black bathroom handles it all is stunning, stunning and more. I just love how you think and would welcome you into my home anytime to “tweak”…the entire house😂😂😂. Just fantastic and thanks for sharing! Di
WOW what a transformation ! So impressed, good job ! It had some much light to your master bed room! I love the green pillows.
Kristine you have done it again! I love that sophisticated color combination in the bedroom. It is very relaxing!
Love everything you’ve done and ALWAYS look forward to seeing a new email from you! Looking forward to your post on the basket-turned-light cover to learn how to attach it…hint, hint. Thanks for inspiring me all the way in Lincoln, Nebraska, USA. Karen
Thanks Karen. I was just working on the basket light tutorial :)
This is amazing! So very clever, well done. You’ve inspired me to no end!
YOU HAD SOME PILLOWS ON A BED – THEY WERE CARMEL BROWN AND WHITE – I CAN SEND PIC IF YOU NEED IT. I JUST WANTED TO KNOW WHERE TO BUY THEM.
THANKS
JUDY
Hi Judy. If you have a pic (or just a link to the blog post where you saw them) that would be great. I’m not sure which pillows you’re referring to exactly. Cheers.